Oh my, I am so excited to be sharing our quirky and fun paper birds with you today! They are in fact a very easy origami bird pattern for kids, but with a little extra decorating they look extra fun! Learn how to make a paper bird today! This is the perfect paper bird craft idea for kids. As you know we are great fans of paper crafts – paper is so accessible and so very versatile. There are so many great crafts you can make from paper. So it was about time we had a go at this super cute paper bird diy! It joins the ranks of of the rest of our Paper Crafts for Easter, as well as our extensive collection of Origami for Kids.. with more Easter Origami for Kids here!
No paper bird craft template needed for this adorable make!
These easy doodle bird origamis, were first shared in Feb 2019
If you like these Origami Birds.. you may also like these Paper Bird Finger Puppets:
Origami Bird Craft for kids – MATERIALS:
One square piece of paper (15 x 15cm is nice)
Pens for decorating
Scissors/ glue stick for decorating
Sticky eyes (optional) – we love these sticker eyes.. so fun (US/ UK – affiliate links)
Scrap paper for feet (optional)
How do you make an origami bird? Watch our video how to:
We have both an origami bird video tutorial, as well as the origami bird step by step instructions ! Do choose the medium that you enjoy more! The video is at the bottom of the post!!
How to make Paper Birds tutorial with step by step instructions
You can get complete lesson plan overview and printable instructions with step by step photos on my Teacher's Pay Teacher's store for less than the price of a cup of coffee! I hope you find it helpful!
Check out our paper bird craft steps here.
Recognise these first four steps? They are in fact exactly the same as our basic Origami Bookmark! So hopefully nice and easy for regular Red Ted Art readers!
Begin by folding your square paper across the diagonal to make a triangle.
Then pring the right pointy corner over to meet the corner with the right angle.
Repeat with the left pointy corner. You should now have a square with two flaps.
Now time to make the stand and wings
Rotate the square, so you have a diamond in front of you. Fold up the base by about 1.5cm – this will make a little "stand" that will allow your Paper Bird Origami to stand up.
Fold in the sides by about 1cm – this will be your paper bird's wing.
Flip the paper over. And fold down the top two flaps as per the pictures. This isyour origami bird's beak.
Your basic origami bird is now finished and will stand freely!
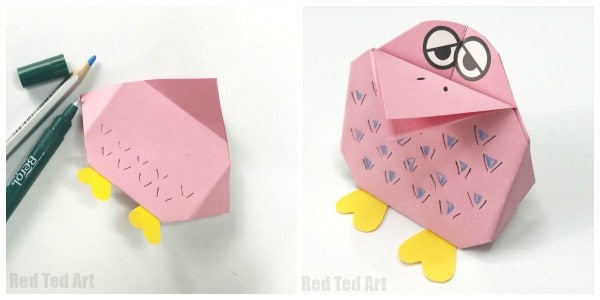
If you want to make the bird extra cute.. you can trim the head a little.. add some sticky eyes and glue on some feet! But all of these are totally optional.
Finally some doodling
Finally we had fun adding some doodle decorations to the quirky paper bird's tummy. Now it is time to make MORE Origami Birds in all sorts of colours and patterns:
And they are finished! Aren't they fun? Do have fun exploring different patterns and eyes!
Now watch the video instructions:
Want to know how do you make a simple origami swan?
We have our oh so simple origami swan pattern for you here!
If you like these Origami Birds.. you may also like these Paper Bird Finger Puppets:


0 Response to "Art for Kids Hub Origami Parrot"
Post a Comment